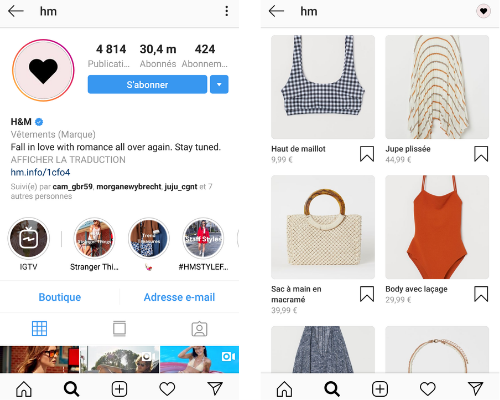
Boosting your sales with Instagram: the Shopping feature
You sell products on your online shop and want to showcase them? Business accounts can now tag their products in a post to highlight them and redirect qualified traffic to their website.
In addition to linking directly to the product page on your site, this feature creates a "shop" tab on your Instagram account. Instagram is also considering a future where you will be able to make purchases without ever leaving the platform — yet another reason to get started on this network.
Indeed, following the lead of the giant Facebook, which acquired the app in 2012, Instagram wants to stand out in social commerce by becoming more than just a social network — a source of inspiration and content for internet users.
The benefits of Instagram Shopping
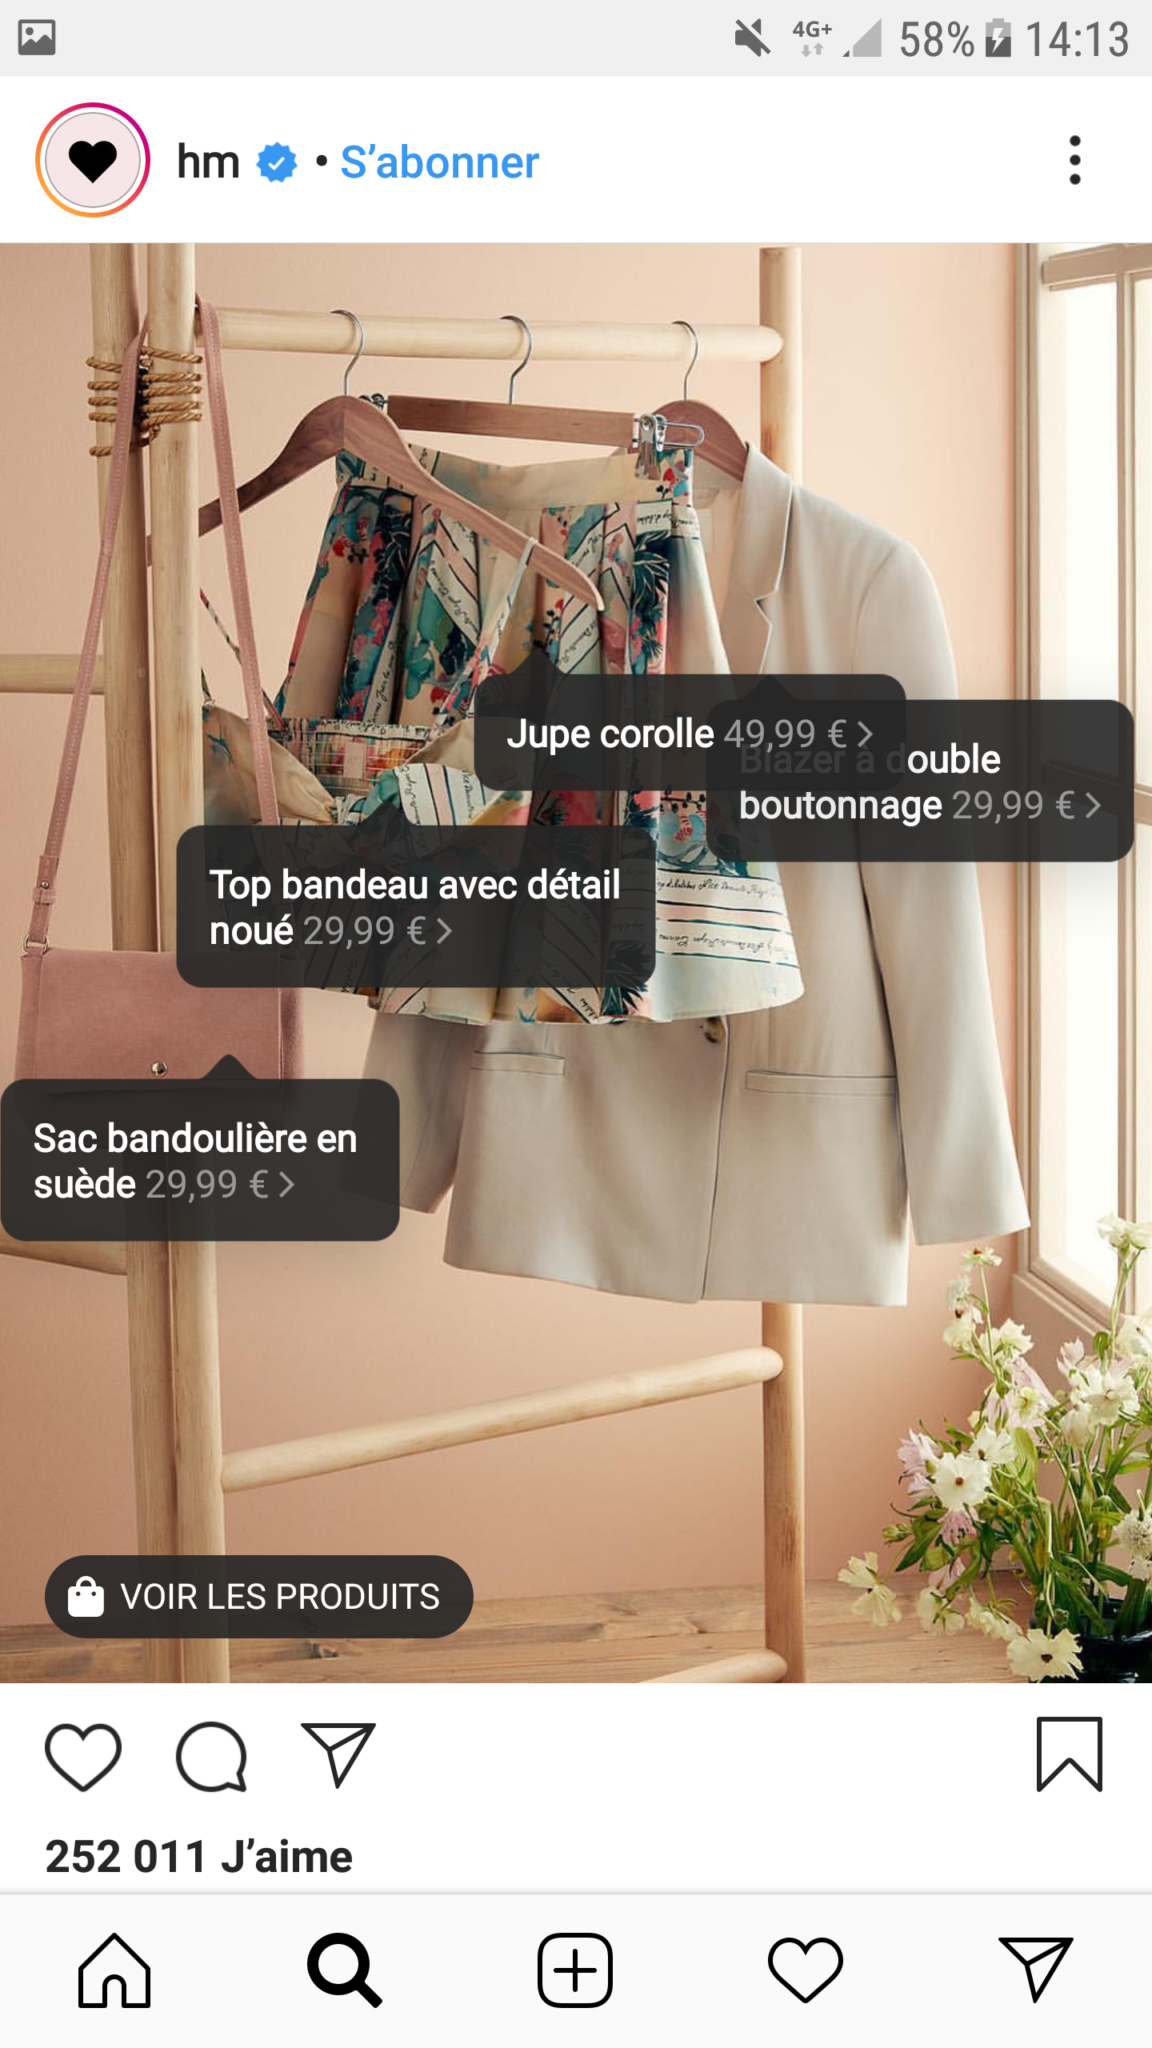
Instagram Shopping publications cover both posts and stories. They allow businesses to:
- make it easier to showcase and sell products, particularly with the help of more detailed product sheets and price display — and, as mentioned, to have a new "shop" tab serving as a commercial storefront.
In brief:
- It is a very intuitive feature: your user quickly understands how to use it — they select the bag and get the information.
- You can tag up to 5 items.
- The conversion funnel is simplified: with one click, users are directed straight to the e-commerce page for the item.
- The new feature does not significantly change the appearance of posts. Only a small bag icon appears on the thumbnail, indicating that the item is available to purchase.
It is worth noting that, to date, Instagram Shopping and the link in the biography are the only two means available to redirect traffic to your website (only accounts with more than 10,000 followers can add links in their stories).
How to set up Instagram Shopping
Setting up the Shopping feature on your Instagram account requires a few prerequisites that can seem slightly technical. So buckle up — here we go! But before anything else, you will need to meet certain criteria first.
1 – First, you need a Facebook Page
Be careful! Do not confuse: a Facebook profile and a Facebook Page are not the same thing. The profile is entirely personal, whereas the Page is intended for broadcasting, or even selling. Creating a Page is what will allow you to create a shop on social media.
- Start by creating one, if you have not already done so.
- Once that is done, you will need to configure it correctly. To do this, let's begin by adding a shop tab so that visitors can find your various products. Go to your Page settings and change the default template by clicking on "Templates and tabs".
- Then simply follow the shop configuration steps. You will see that example pages are suggested depending on your type of activity.
We recommend a very comprehensive article by Happydigital that will help you configure your Page perfectly.

2 – Add your Facebook Page to Business Manager
Now that your Facebook Page has been created and properly configured, you will need to link it in Business Manager. This is a new tool for managing Facebook Pages and adverts. It is the engine at the heart of the process, as it sits at the centre of setting up the Instagram Shopping tool. To link this tool to your Facebook Page, it could not be simpler — just follow the procedure.
3 – Upload your products to a Facebook catalogue
If you have more than 20 products and regularly add more, it is very useful to go through Business Manager to create your Facebook shop. Here too, you have several configuration options. The most practical is to upload your products directly from your website using an RSS feed.
- Install the WooCommerce, PrestaShop, or other plugin corresponding to your site;
- Create a product feed;
- Add the new catalogue in Business Manager under Business Settings – Data Sources – Catalogues;
- Add products to the new catalogue by selecting the first option: Use Data Feeds.
Another solution would be to integrate your product catalogue manually into Business Manager. This is the simplest option for shops with fewer than 20 items that do not need regular updating.
See the steps to follow on Facebook
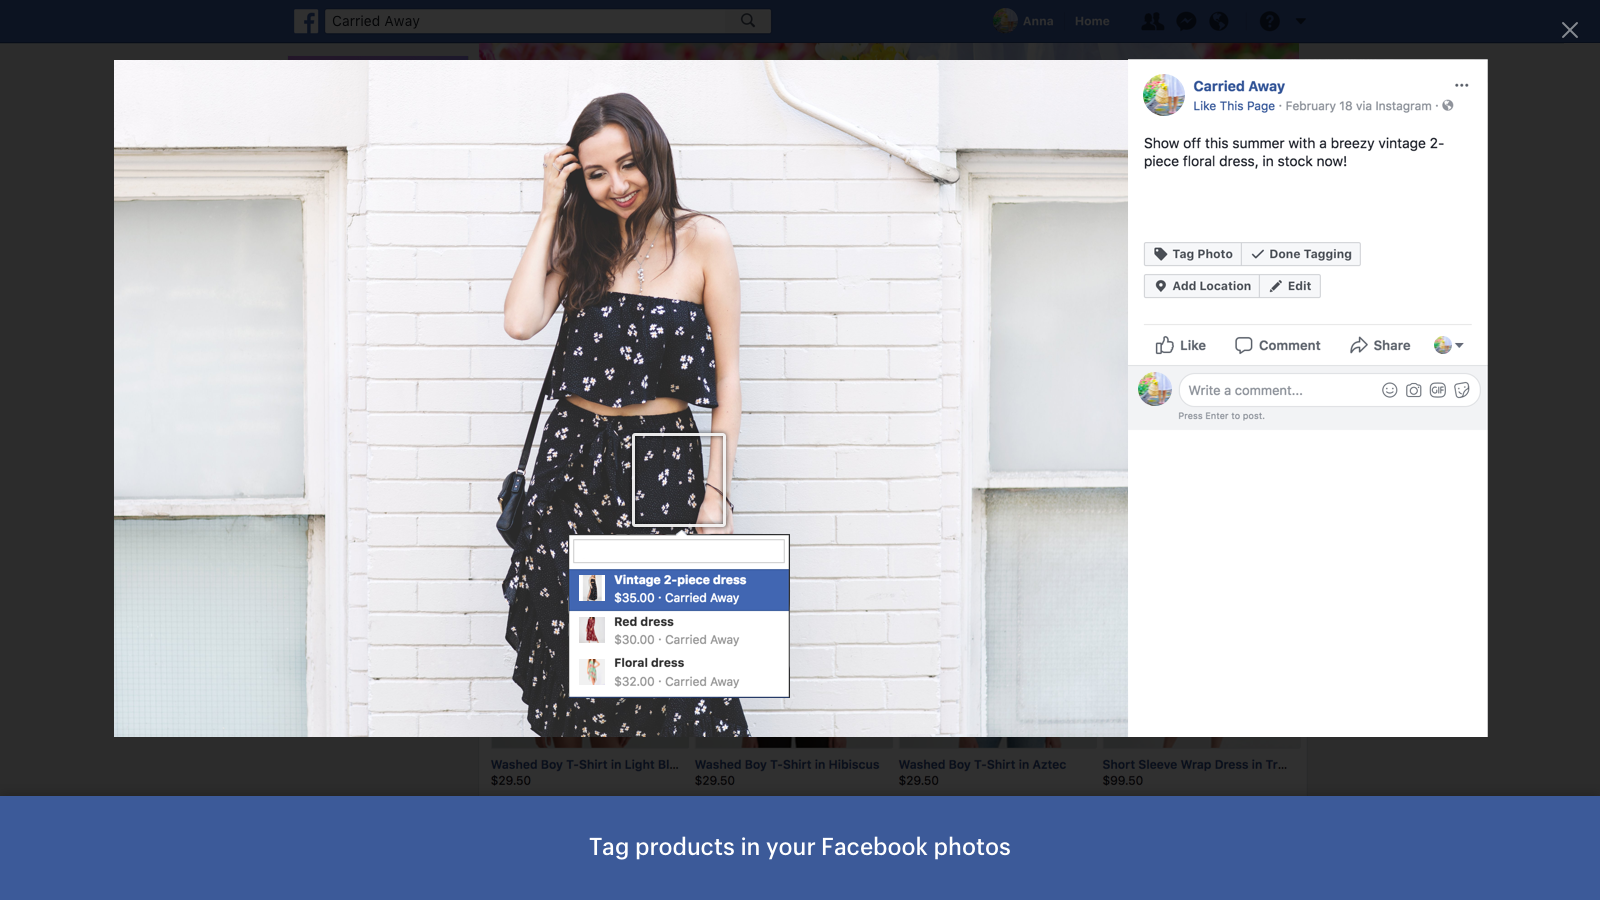
4 – Put your products on Facebook
Your shop is officially live! You can now link your Facebook photos to your products. It could not be easier. Upload a photo to your Facebook Page. A small shopping basket appears on the side: simply tag your product as you would when tagging a Facebook friend. Then run a test to make sure everything is working correctly.
5 – Have a professional Instagram account
We are now done with Facebook. These steps may seem laborious, but they are necessary for your Instagram shop to function properly. Since both apps belong to the Facebook group, they are linked — your Facebook shop will be the one used for your Instagram shop.
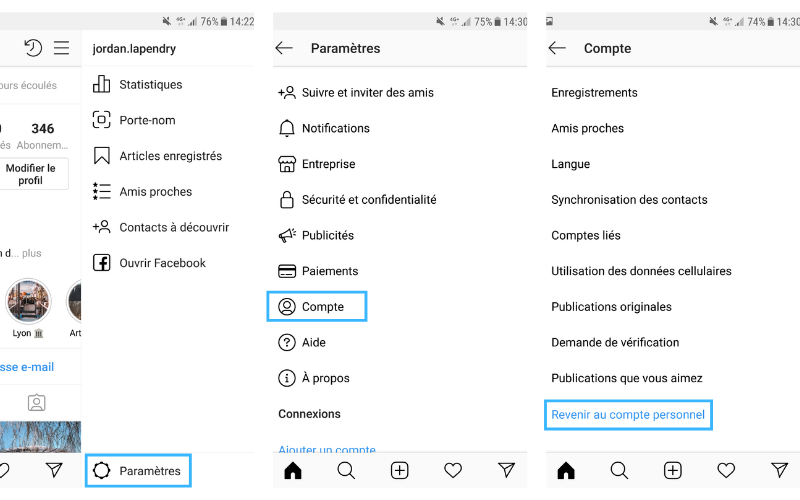
Let's now move on to Instagram. The first thing to do, if you have not already done so, is to switch your standard account to a professional account. This process is entirely free and will give you access to all the commercial features of the app. To find out how to do this, please refer to our dedicated section on the subject. The step is very simple and quick to carry out. Once done, we will move on to the next stage.
6 – Connect your Instagram account to the same Business Manager
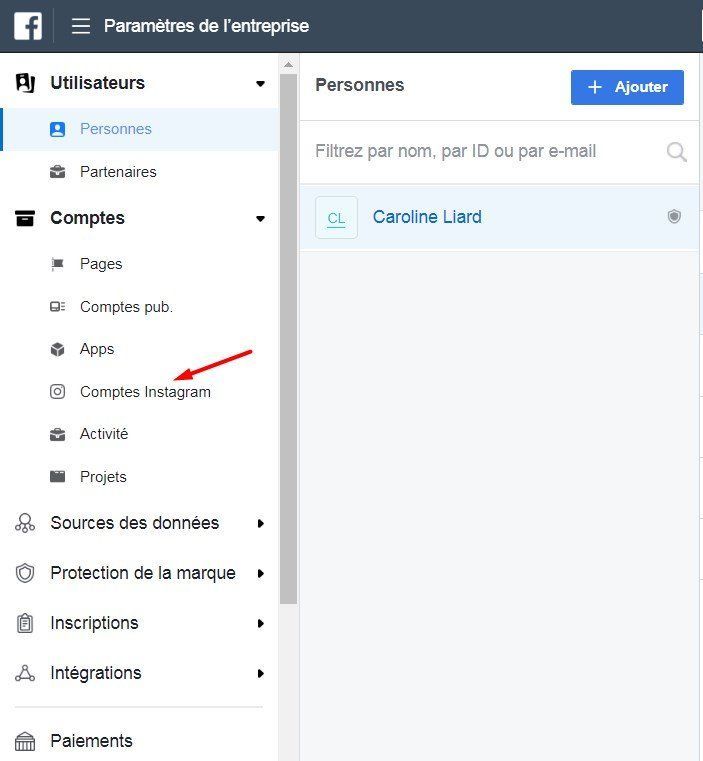
- Now that your account has officially been switched to professional, you will need to connect it to the same Business Manager as your Facebook account. Go to your Business Manager, select Business Settings via the 3-bar menu in the top left, then select Instagram in the left-hand menu under Accounts.
- Enter your account name and password.
- If you are indeed selling physical products and comply with their commercial guidelines, this authorisation should reach you within two weeks. You can always follow up via the Facebook Help Centre.
After your request has been validated, a new Shop tab should appear in the menu of your Instagram app on mobile. The first time, a "Get Started" prompt should be displayed. You can also access it by going into the app settings and tapping Shopping. After tapping Continue, you will need to select the product catalogue to associate with your professional Instagram account and tap Done. ✅
Once all validations are complete, all you need to do is tag your products in your Instagram posts — and you're done!
YOU MAY ALSO LIKE
UGC, the future of marketing: How user-generated content can revolutionise your marketing strategy
by Yumea, 7 March 2023
UGC (User Generated Content) is changing the game in the world of marketing. With the rise of social media and content-sharing platforms, users are… READ MORE
Category: News , Getting visible online , Social media
Comments: 0
How to use Instagram to reach your audience and drive traffic to your site?
by Yumea, 1 February 2023
Social media has become an indispensable tool for businesses looking to reach their target audience and drive traffic to their website. With more than 3.8 billion active users… READ MORE
Category: Getting visible online , Instagram , Social media
Comments: 0
7 Artificial Intelligence (AI) tools to know in 2023
by Yumea, 12 January 2023
In 2023, there are many platforms using artificial intelligence (AI) to help users write content and generate images. If you are looking for tools to help you write… READ MORE
Category: News
Comments: 0
Have a similar project?
Let's talk it over in 15 minutes. No sales pitch, just a technical chat.