How to Create a Mobile App – Part 2 – UX & UI
It is time to make the first investment. If you have already read Part 1 – Before Spending a Single Penny, you should know:
- How to validate your app idea.
- Who will use your app and what the benefits will be.
- How you will win against your competitors.
- What your business model will look like.
Let us now look at how we can put the plan into action.
–
Planning your app will have more to do with psychology than pure development or design.
Your audience research will be at the heart of the challenge for UX designers, as well as for project managers and developers, who will create user stories for you on this basis.
Let us take a closer look.
Defining the User Flow

Once you know what kind of benefits you will be able to offer users, you need to map out the journey you want them to follow. This will ensure that they make the most of everything your app has to offer. In other words, you need to create a "user flow".
Note down all the things you expect the user to do within your app, then plan the optimal pathways (or flows) for these actions from the welcome screen.
This part is more about "how will things unfold?" — and above all, "how will they reach all the desired features?"
Above all, do not forget that it is crucial for you to test your flow afterwards.
You need to know precisely where your users interact and engage most with your app, and what the crucial steps are throughout the overall flow.
List Your App's Features
Sometimes the question "how do I create a mobile app?" actually depends heavily on another question: "what are the app's features?" Just as when you are laying the foundations of a house, everything will depend on what you actually want to build afterwards.
You know the flow, you have an idea of what the user should expect and how they will get there — so now it is time to address the features: the attributes that will make many additional desires possible.
These could include notifications, payment methods, social media sharing… you need to identify and name them yourself.
Look at apps with a similar purpose to yours. Explore their features and see what people say about them.
On this basis, you can identify:
- what is missing from these apps
- what is unnecessary
- what can make your app more attractive than theirs
- which features will be free and which will be paid
- which features will be essential for adding value to your app
- etc.
Features are also very important when creating user stories, as they will resolve the specific problems or needs of your users.
Think About the User Experience

Let us now bring everything together to start designing how people will actually experience your app, step by step.
User experience (UX) is about creating meaningful interactions with your app, ensuring users have the best possible experience when using it.
Do not be confused here — meaningful interactions does not mean fancy interactions. There is no need for special effects or flashy animations.
People are generally impatient, and if they cannot get what they want straight away, there is a high risk they will simply stop using your app.
Obviously, if you can afford special effects or if you are creating a game, you may well generate interest. But if you are offering an app that needs to solve a specific problem, people would rather solve that problem quickly and easily. That is generally the expectation, and they do not expect your app to put on a display worthy of the Sydney fireworks. Solving their problem is sufficient.
To keep things that way, two things must be kept in mind:
- There must be no room for confusion
- You can never leave your user on their own
There is nothing worse than feeling neglected.
Your app must be clear, easy to use, intuitive, and must make people want to go further. This means users need to know exactly where to click next so they can easily follow the right path and see everything you want to show them.
It is like being a chef at a fine restaurant. You only show and serve what you consider to be the best for your guests. You know them — so you know what they need, do you not?
Once you have defined all the flow and the most important UX elements, create a mockup like this one:
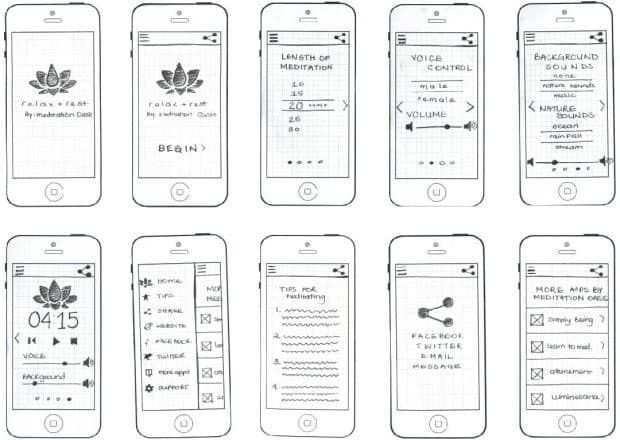
https://tmecley.wordpress.com/2014/03/05/relax-rest-paper-prototype-screen-prototype/
You must remember, however, that creating a mockup is not simply about making drawings.
A mockup is a preview of the possibilities, features, and flow of your app. It contains no refined design, nor the exact UI elements.
You can obviously create a simple paper mockup of your app yourself, but you can also use tools with many ready-made features such as Balsamiq Mockups.
This is the right time and place to ask questions such as:
- Where should the CTA buttons go?
- How do you move people's attention from one place to another?
- What is the first thing they should see or notice?
- How do you build anticipation to encourage them to click further?
- How do you design a shopping basket or a payment page?
- And much more…
Going further, the deliverables of a good UX stage should include:
- An information architecture for the entire app (flow, features)
- UX wireframes (mockups)
- Interactive prototypes (examples of interactions, effects, etc.)
- Specifications for UI designers (with detailed explanations)
Preparing Visual Designs
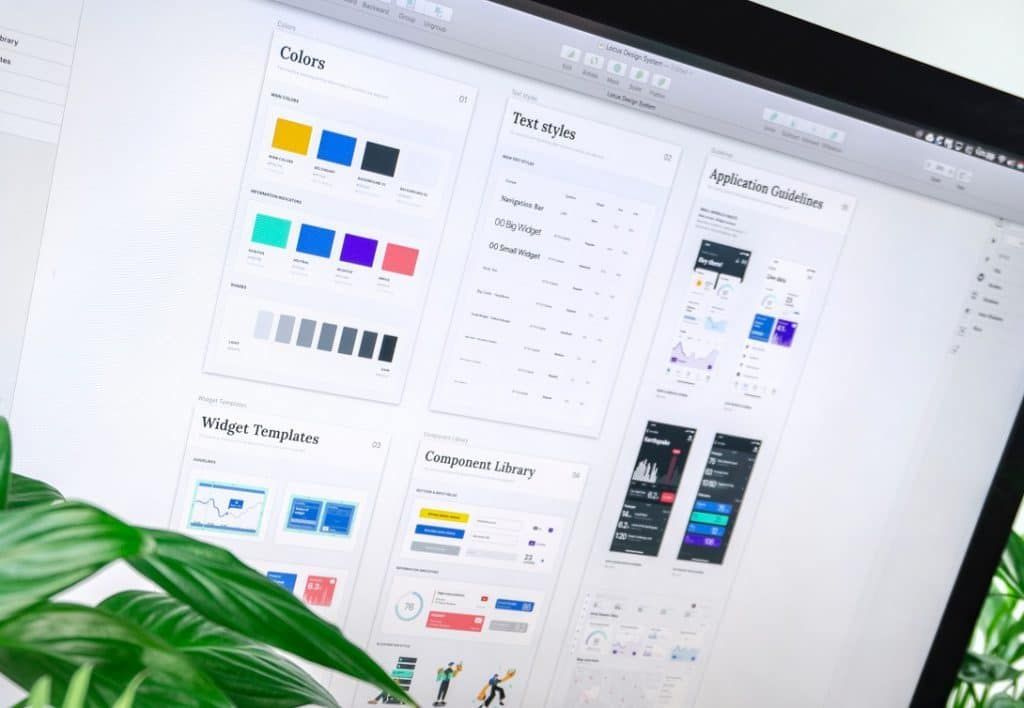
It is now time to bring in the colours and transform the sketches into actual pages.
If you are a developer, you may need some help with the designs. Having gathered all the documentation, you have pretty much everything a designer will need to get to work.
To make your work easier and more fluid, you can use tools such as Figma, Sketch, InVision, and many others. Most of them come with many ready-made designs, features, and components, and are ideal for team collaboration — allowing you to flag suggestions and edit elements directly.
A great design and a dynamic interface can also be one of your added-value differentiators, which will win your app many fans. However, as mentioned earlier, check how far you can push the designs to make sure you are not paying too much for something that will ultimately feel tiresome to users.
PS: Designing the entire app in a consistent colour palette is also useful for brand recognition — but good designers know this very well.
Preparing the Initial Project Backlog

It is now time to put everything in order and decide which things need to be done first in the development phase.
In project management terms, we need to create the initial backlog for the project — a prioritised list of tasks to be completed for everything to work.
To ensure your team always knows what needs to be delivered first, you will place the most important items at the top of the list. Always.
To prepare a good list, we will take all the information gathered — which we will call "requirements" — and place it into the roadmap: an action plan over a specific timeframe.
All items in the roadmap will then be divided into "epics" — larger work objectives that can in turn be broken down into specific tasks, called "stories".
There are a number of things that can affect the priority of a specific epic or story. For example:
- The client urgently needs something
- Difficulty of execution
- X will be easier if we do Y first
- Waiting for feedback and reviews
- Development capacity
- etc.
Most of the time, it is the project manager who prioritises specific tasks. However, it is the developers who decide how quickly each task can be executed.
Choosing the Right Technology
The plan is in place. It is time to choose the engine at the heart of this beast — so we need to choose wisely!
As a general rule, there are a number of different technology options for app development:
- Platform-specific native application These apps are coded for iOS or Android.
- Cross-platform native application These apps use shared development kits but can still run natively. They lose some native features but are ideal for businesses with a smaller budget who want to target both operating systems.
- Hybrid application A hybrid app is compatible with both iOS and Android. You will not get all the benefits of native apps, but hybrid apps are both cost-effective and quick to deploy. With this approach, you do not need to write different code bases for each platform — you write one and use it across all platforms.
We will not go into every detail here, or this article will never end.
With that, let us get things moving. We will develop the app in Part 3 – Development and Maintenance. Stay tuned.
Freely translated from English: PagePro

Have a similar project?
Let's talk it over in 15 minutes. No sales pitch, just a technical chat.