WordPress posts: how to create and manage them
Although WordPress is a fully featured content management system (CMS), its most fundamental function remains creating posts. You can create posts for blog content, or you can create them for WooCommerce products. You can even create custom post types that function as events, portfolio entries, forum discussions, and almost anything else you can dream up. Our goal in this article is to help you create and manage your posts so that you can get the most out of WordPress, even at the most basic level.
What are WordPress posts?
Posts are the foundation of WordPress's entire content system. Of course, plugins, widgets, themes, hooks, and APIs are all great — but without posts, they can do virtually nothing.
The official WordPress.org documentation is very concise on the matter:
Posts are the main element/content of a blog. Posts are writings, compositions, or discussions.
Together with pages (which are similar but used in a completely different way), posts are the primary means by which administrators and visitors interact with your site. Publishing a photo of your magnificent lunch along with a recipe? That is a post. Writing a tutorial on using Divi? That is a post. Writing an article about how to create and manage WordPress posts? That is itself a WordPress post!
Jokes aside, working with posts is the most fundamental and useful skill you can develop in WordPress.
Creating WordPress posts
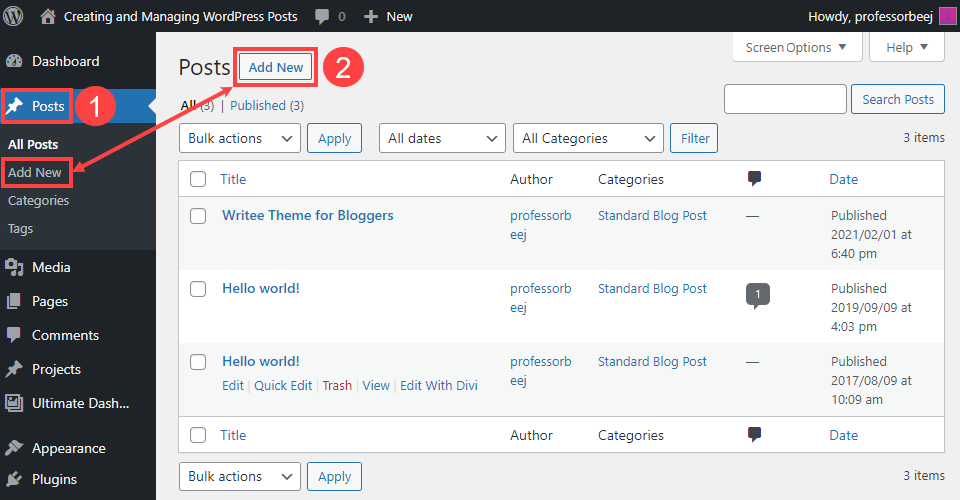
The first step in creating WordPress posts is to take a look at your WordPress dashboard. Find Posts in the left-hand sidebar (1). From there, you can select Add New in the same sidebar or at the top of the All Posts page (2).
From there, you will be taken to the editor, which now defaults to Gutenberg. You can also use the Classic Editor plugin — the process will be the same but the appearance will differ.
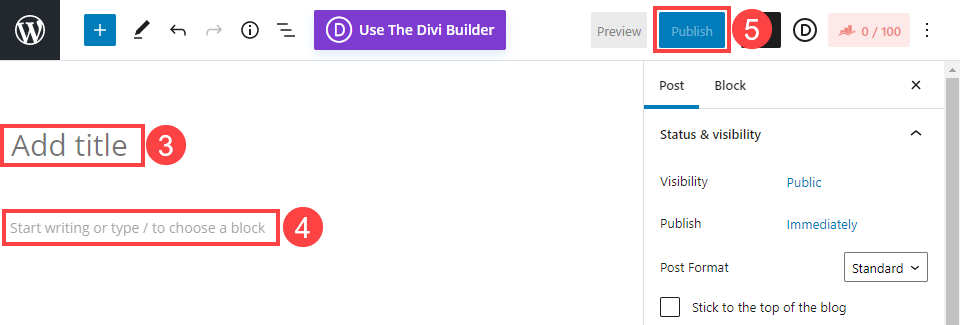
Using the block editor is very straightforward. Where it says "Add title" (3), enter the name you wish to give your post (which will also be used for the URL). By default, the block editor adds a Paragraph block to help you get started (4). As it aptly says: Start writing or type / to choose a block.
Even if you do nothing else with the post, you can fill in these two fields and click Publish (5). That is ultimately all it takes to create a WordPress post! However, you should absolutely do more than that before hitting the publish button. You should especially add metadata and a featured image. These elements are a great help.
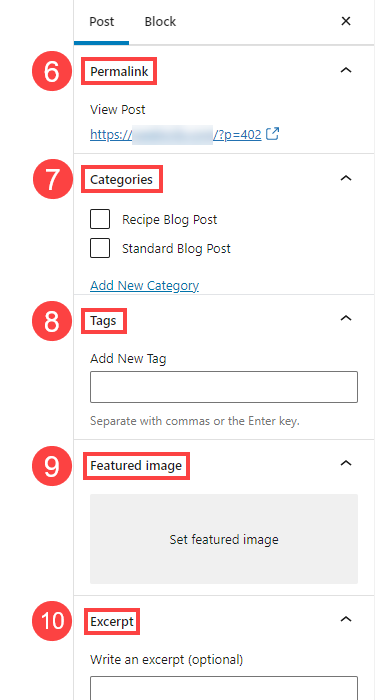
The Permalink (6) of your new post is the URL at which it will be displayed. You can customise it as you wish, but in most cases it will mirror the title you chose. Selecting appropriate categories (7) will not only help your users navigate your site and find your content, but will also tell search engine crawlers how things are organised.
Tags (8) are similar to categories in that they are another way of organising your content, but in a more specific way. For example, if blog posts about recipes form the category, you might use the word "cheese" as a tag to refine the content for users and indexing bots.
Many themes and plugins use WordPress's featured images (9) to identify your posts. A featured image can also be the primary visual when a post is shared on social media. The excerpt (10) is the written complement to this shared image. Themes and plugins, social media, and even search results often display excerpts when they are available. Summarising the post's content in one or two sentences is therefore well worth doing when creating WordPress posts.
Managing WordPress posts
Once you have created a few WordPress posts, you will occasionally need to maintain them and manage a few evolving details. Under All Posts (1) in the dashboard, hover over an entry and a series of options will appear (2).
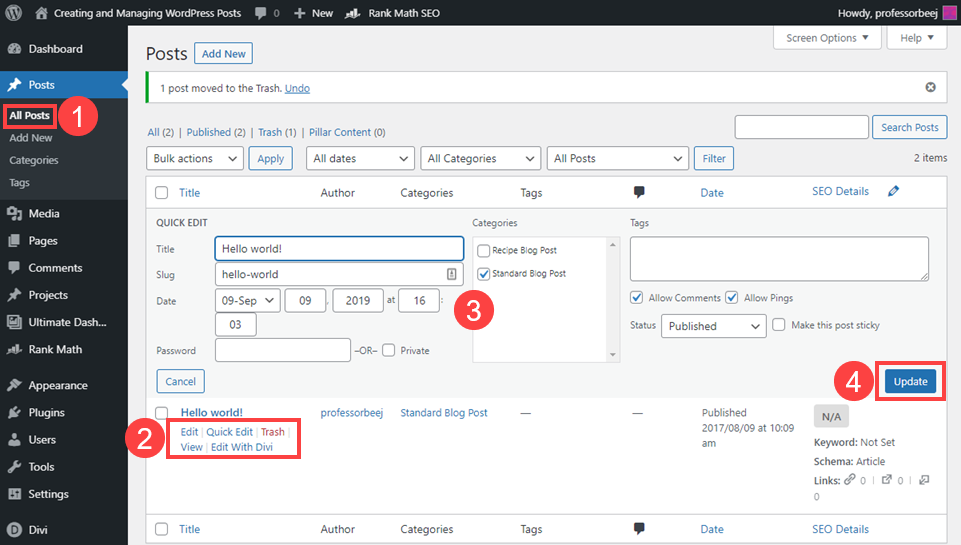
Clicking Quick Edit (2) brings up the post details (3) and lets you manage them without going through the content editor. You can adjust the title and slug, the publication date, categories, tags, publication status, and so on. You cannot, however, edit the written content, featured images, or other details created in the block editor. To modify those, use the Edit button (2) to return to the block editor.
Managing tags and categories
Tags are very straightforward to manage. You can create them on the fly and in real time simply by typing them into the block editor field or the Quick Edit panel. For more precise control, go to Posts – Tags (5), where you can create and control the name, slug, and description of every tag on your site.
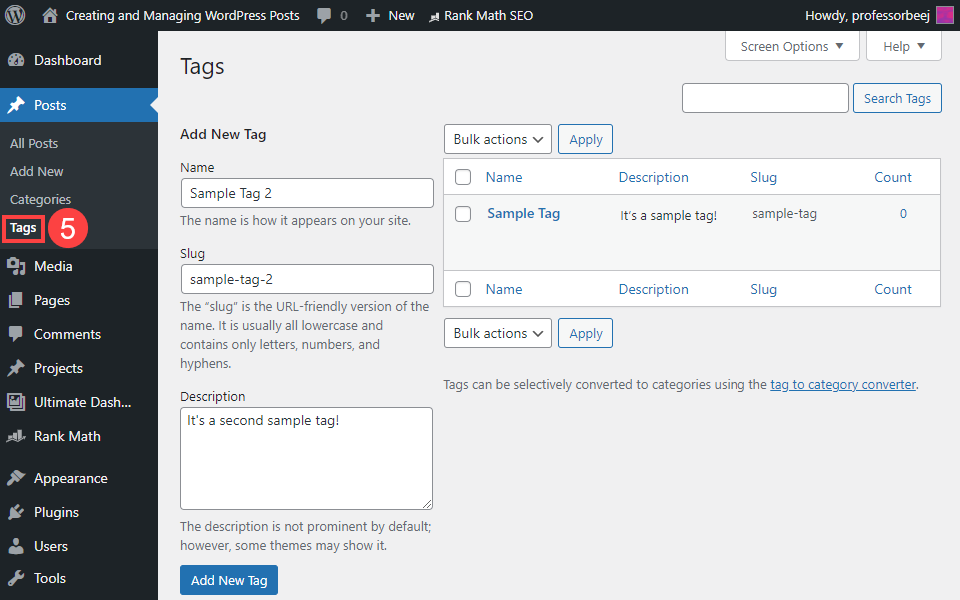
The description is rarely used, so do not worry about making it perfect. The "Count" column shows how many posts on your site use a given tag. Click on it to access the list of those posts.
If you look at Categories (6), you will notice the page is remarkably similar. In fact, with one major exception, it is exactly the same. This is no coincidence, as tags and categories are both integral to the organisational structure of all WordPress content.
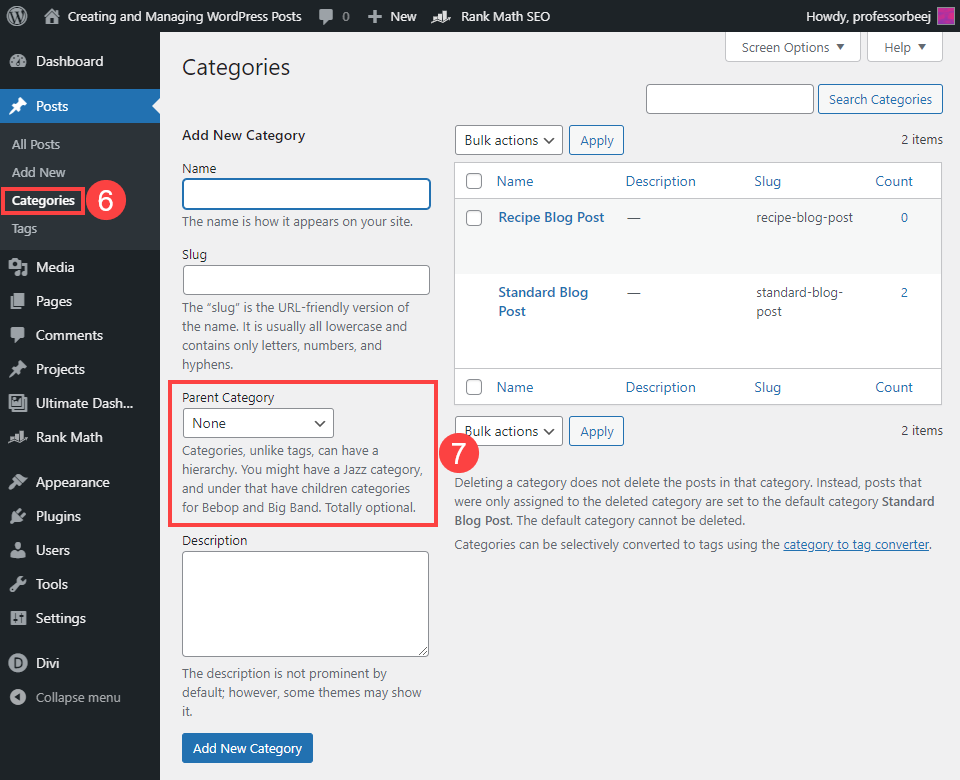
The Parent Category drop-down (7) allows you to assign a taxonomy to your categories. This means you can have sub-categories to help organise your site. For example, the sub-category Soup Recipes could be placed under the parent category Recipes. But Tomato Soup would still be a tag, because it is more specific.
Summary
WordPress posts are the most fundamental part of using the CMS. Once you have learned the ins and outs of what posts allow you to do, WordPress will have you jumping through hoops in no time. Managing posts can represent a great deal of work, especially if your site contains thousands of them. Having good classification and tag structures can help, and knowing when to take advantage of the Quick Edit button to avoid loading the full block editor can save you an incredible amount of time over the lifetime of your site.
Freely translated from English: article Elegant Theme
Image credit: GoodStudio / shutterstock.com
Have a similar project?
Let's talk it over in 15 minutes. No sales pitch, just a technical chat.